Showing posts with label Pinterest. Show all posts
Ways to Market Your TPT Products
The first priority you should worry about is making QUALITY products. If you don't have products, you can't market your store.
When you do start marketing, there are some different opportunities for you. Remember though that you don't want to be pushy or sales-spammy on many of these.
✪ Submit a free and paid resource to the TPT newsletter weekly. The free item must be 10 pages or less. That includes the resource, cover, credits, etc. Everything is included in this count. The paid resource will cost $50 if your product is picked. The paid resources that I have had selected have been worth the fee. The money comes out of your monthly earnings.
✪ Promoted Resources on TPT. You can check out the blog post here for more information.
✪ Pinterest. Remember this isn't about just posting product cover pins. Create pins of your resource in action or staged. Also, try to pin with the 80/20 rule in mind - 80% content (blog posts, articles, funnies, memes, etc that are yours or others) and 20% products (yours). If you want to pin for other people, do it by pinning their blog posts not their products. As I've said before, I don't think pinning parties are good Pinterest etiquette. You can also pay to promote pins on Pinterest. Once your pin is out there, it will keep going! You can also do Promoted Pins and pay to advertise on Pinterest.
✪ Facebook. Interact with your followers. Again try to keep the 80/20 rule in mind by posting memes, videos, blog posts, etc. 80% of the time. Your FB feed isn't meant to push your products on your followers day in and day out. Try a video about educational tips or how your product can be used in the classroom. You can pay for FB ads.
✪ Instagram. Again no one wants to see product after product. Include pictures of your classroom, family, pets, favorite quotes, etc. If you pay for a FB ad, you have the option to include Instagram as part of the ad.
✪ Blog. On your blog, you want to provide content. In your content, you can do a "soft sell" on a product. The focus should be on helpful tips and information for the classroom. If you have a product that fits the topic, then link to it. Make sure you have great photos to pin it on Pinterest for your content.
One thing to keep in mind that I keep seeing and others keep mentioning as well, do not post your products in FB groups that are not specific for product posting. I belong to quite a few FB groups and most have the rule of NOT posting products. Read the rules and follow them. Think about who your potential buyer is. Unless you are selling clip art, it is most likely NOT a fellow TPT seller. So unless someone is asking for resource suggestions or the board is for posting resources, don't use your FB groups for marketing.
Pinterest Tips Part 5
In Part 1, we talked about setting up your Pinterest account and boards. In Part 2, we talked about pinning and repinning things. In Part 3, we discussed creating pins. Part 4 is some additional thoughts and tips on Pinterest. For Part 5, we'll talk about adding a Pinterest Widget and the Pin It (Save) Button.
Pinterest Widget
Just an FYI. My blog is on Blogger. There are Wordpress directions on Pinterest. The Pinterest Widget can be added to the sidebar or bottom of your blog. I put mine at the bottom. I don't know the best place. I just don't like a cluttered sidebar.
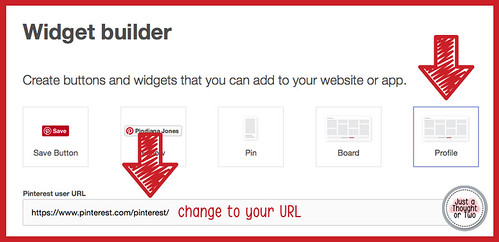
↬ Go to Pinterest's Widget Builder page here.
↬ Choose Profile. In the Pinterest User URL box, delete the wording and paste your Pinterest URL in the box. Be sure when you copy your Pinterest URL you are on your profile page not your feed or a specific board.
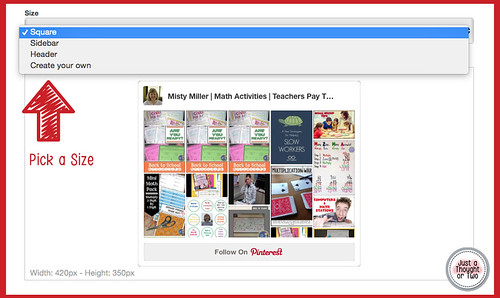
↬ Choose the size you would like your Widget to be. Mine is a Custom size (115x120x900). I probably had some thought to that but not sure what it was. I guess that is what fit on my blog.
A code will come up in the bottom box. Copy the code in the first box.
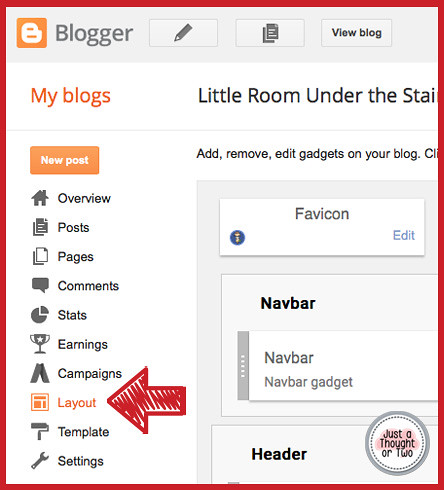
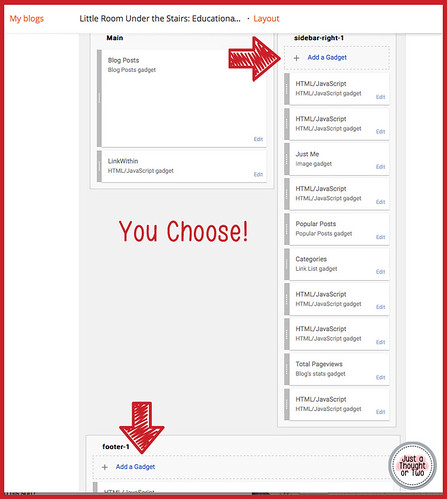
↬ To add the code, you need to add a Gadget to your blog. Click the Layout button and Add a Gadget.
★ ★ If you don't know what you are doing with HTML, check out this blog post from Goyllo to know how to backup your template and all blog posts. ★ ★
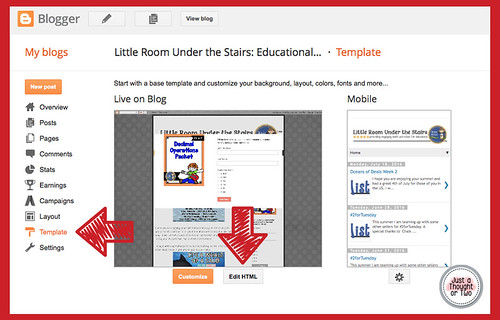
↬ Copy the bottom code from the Pinterest Widget Builder page. Then you need to go into your HTML. Click on the Template button and Edit HTML.
Save (Pin It) Button
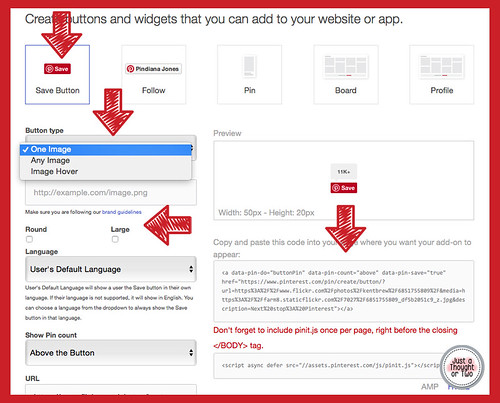
↬ To add the Save (Pin It) Button to your blog, you are going to go to the same Pinterest Widget Builder page. Click on Save Button.
↬ Choose which type you would like. Also, click on Round and/or Large if you want. I use the hover button.
↬ Copy the HTML code that appears in the box.
★ ★ If you don't know what you are doing with HTML, check out this blog post from Goyllo to know how to backup your template and all blog posts. ★ ★
↬ Go into your HTML. Click on the Template button and Edit HTML.
↬ Click inside the HTML code box. Click Command+F (Mac) or Control+F (PC) to bring up the search box. Search for </body>. You will paste the Save Button code right above </body>. Delete "async defer" from the code. Click Save Template. You now have a Save Button on your blog.
Pinterest Tips Part 4
In Part 1, we talked about setting up your Pinterest account and boards. In Part 2, we talked about pinning and repinning things. In Part 3, we discussed creating pins. Part 4 is some additional thoughts and tips on Pinterest.
Do you have a blog?
◈ For each post have some great pinnable images.
◈ Add a Pin It button to your blog. This will make it easier for people to pin those amazing blog post photos.
◈ You can add a Pinterest widget to your blog so followers can see what you are pinning.
How often should you pin things?
You should be pinning every day in my opinion. Of course, you don't want to pin the same thing over and over to the same board. You also don't want to be seen as a rapid pinner (pinning a lot in a short amount of time). This can be seen by Pinterest as spam.
◈ If you can't remember to pin, set an alarm on your phone or computer to remind you to stop and do some pinning.
◈ You can also use a pin scheduler. I use Tailwind. There is a fee for it but I find it worth the money. I can schedule my pins a month at a time (some people do a week at a time) and not worry about it. Yes, I still do other pinning besides the scheduled pins, but at least I know pins are going out if I forget. Other schedulers include Traffic Wonker, Buffer, and Board Booster. I do not know anything about them.
Pinning Parties
I DO NOT RECOMMEND PINNING PARTIES. Yes, TPT has a forum for Pinterest which is mostly about pinning parties. I don't recommend them because 1) you are then just pinning products (remember 80% content, 20% products) and 2) you don't know the quality of the resource you are pinning.
Collaborative Boards
Collab Boards are a great way to share pins and find other pins you can repin. Be careful, though.
◈ Some collab boards are where pins go to die.
◈ Check the pins on the board to see if they are getting repins.
◈ Is the board just products or are there content pins? I
◈ f you want to join a collab board, check the board description to see if they are accepting new collaborators and if there is an email to contact the board owner. You can also message the board owner (the first picture shown above the pins) on Pinterest.
◈ Check out Pin Groupie to find collab boards in your area of interest.
Happy Pinning!
Do you have a blog?
◈ For each post have some great pinnable images.
◈ Add a Pin It button to your blog. This will make it easier for people to pin those amazing blog post photos.
◈ You can add a Pinterest widget to your blog so followers can see what you are pinning.
How often should you pin things?
You should be pinning every day in my opinion. Of course, you don't want to pin the same thing over and over to the same board. You also don't want to be seen as a rapid pinner (pinning a lot in a short amount of time). This can be seen by Pinterest as spam.
◈ If you can't remember to pin, set an alarm on your phone or computer to remind you to stop and do some pinning.
◈ You can also use a pin scheduler. I use Tailwind. There is a fee for it but I find it worth the money. I can schedule my pins a month at a time (some people do a week at a time) and not worry about it. Yes, I still do other pinning besides the scheduled pins, but at least I know pins are going out if I forget. Other schedulers include Traffic Wonker, Buffer, and Board Booster. I do not know anything about them.
Pinning Parties
I DO NOT RECOMMEND PINNING PARTIES. Yes, TPT has a forum for Pinterest which is mostly about pinning parties. I don't recommend them because 1) you are then just pinning products (remember 80% content, 20% products) and 2) you don't know the quality of the resource you are pinning.
Collab Boards are a great way to share pins and find other pins you can repin. Be careful, though.
◈ Some collab boards are where pins go to die.
◈ Check the pins on the board to see if they are getting repins.
◈ Is the board just products or are there content pins? I
◈ f you want to join a collab board, check the board description to see if they are accepting new collaborators and if there is an email to contact the board owner. You can also message the board owner (the first picture shown above the pins) on Pinterest.
◈ Check out Pin Groupie to find collab boards in your area of interest.
Happy Pinning!
Pinterest Tips Part 3
In Part 1, we talked about setting up your Pinterest account and boards. In Part 2, we talked about pinning and repinning things. In Part 3, we are going to discuss creating pins.
Programs to Use
I use Photoshop to design my pins. I use Photoshop because I own the program and know how to use it. You don't need to rush out and purchase Photoshop. There are several choices for designing your pins. Here are a few programs you can use:
✔ Powerpoint/Keynote
✔ Canva (They do charge for some design elements.)
✔ PicMonkey
Pin Size
Pinterest says that a 2:3 ratio is best. Canva has the Pinterest Pin size at 735px x 1102px. That is the great thing about Canva. You just click on the Pinterest size image (or whatever social media) and design using that size.
Design
You want your image to be the focus.
✔ Use images that are engaging and colorful. No product covers. If you don't have a photo of your product in action, then stage the product.
✔ Use relevant text. Don't get crazy on the fonts or the amount of text. They need to be readable on mobile.
✔ Use your branding: logo, name, colors, etc. If you're using your logo, keep it small.
Uploading Your Pin (if it is for a product)
✔ Click on the plus at the top of your Pinterest page.
✔ Choose "Upload an Image".
✔ Upload your image. It can be housed on your computer or the internet.
✔ Add a KEYWORD rich description. Make it useful not just a list of keywords. Think about a description that is 200-300 characters long.
✔ Choose your board.
✔ Click "See it Now".
✔ Click "Edit" and add your link. DON'T FORGET TO ADD THE LINK!
✔ Save.
Go design some amazing pins for Pinterest instead of using your product covers.
Programs to Use
I use Photoshop to design my pins. I use Photoshop because I own the program and know how to use it. You don't need to rush out and purchase Photoshop. There are several choices for designing your pins. Here are a few programs you can use:
✔ Powerpoint/Keynote
✔ Canva (They do charge for some design elements.)
✔ PicMonkey
Pin Size
Pinterest says that a 2:3 ratio is best. Canva has the Pinterest Pin size at 735px x 1102px. That is the great thing about Canva. You just click on the Pinterest size image (or whatever social media) and design using that size.
Design
You want your image to be the focus.
✔ Use images that are engaging and colorful. No product covers. If you don't have a photo of your product in action, then stage the product.
✔ Use relevant text. Don't get crazy on the fonts or the amount of text. They need to be readable on mobile.
✔ Use your branding: logo, name, colors, etc. If you're using your logo, keep it small.
Uploading Your Pin (if it is for a product)
✔ Click on the plus at the top of your Pinterest page.
✔ Choose "Upload an Image".
✔ Upload your image. It can be housed on your computer or the internet.
✔ Add a KEYWORD rich description. Make it useful not just a list of keywords. Think about a description that is 200-300 characters long.
✔ Choose your board.
✔ Click "See it Now".
✔ Click "Edit" and add your link. DON'T FORGET TO ADD THE LINK!
✔ Save.
Go design some amazing pins for Pinterest instead of using your product covers.
Pinterest Tips Part 2
In Part 1, we talked about setting up your Pinterest account and boards. In Part 2, we are going to talk about pinning and repinning things.
Once you have boards set up, you want to start pinning images that will fit on those boards.
Here are some things to remember when pinning or repinning images.
1) Pin to the correct board. I often get in a hurry when pinning and accidentally pin a recipe to a sewing board. Not good, so double check where your pin went to!
ⓣⓘⓟ ☞ You can always edit the pin and change the board. Click on the pin. Click on Edit. Change the wrong board to the correct board. Save. It's that EASY! Now your pin appears on the correct board.
2) Check your link before repinning. Before pinning ANYTHING, check the source. Click on the pin to see where it leads to. Not everything goes to the right place or even has a link. If it doesn't go to the correct place on the blog, find it on the blog or don't repin it. It is frustrating for people clicking on pins for ideas to discover the idea isn't there when they click. If it is just an image, then say that in the description.
ⓣⓘⓟ ☞ If you can find the actual link, then pin directly from the blog. You can no longer edit someone else's pin source.
3) Pin from the direct blog post. Don't just pin from the blog. I made that mistake SO MANY TIMES when I first started pinning. Be sure you are on the actual blog post you want to pin.
ⓣⓘⓟ ☞ To pin the actual blog post, click on the post title. Then pin from that page. It will pin the correct post, not the blog home page.
4) Check the pin description before repinning. There are sometimes strange things in those descriptions. You can edit the description to include keywords. Write a description that will get noticed.
ⓣⓘⓟ ☞ A good pin description includes keywords and is no more than 300 characters long.
5) Things to pin on your education boards. Don't just pin products. Pin things from others as well as your own. Include teacher ideas, blog posts, education articles, parenting articles that relate to school, comics, quotes, memes, etc. Pin a variety of items.
ⓣⓘⓟ ☞ A good ratio to keep in mind is 80% content and 20% product.
6) Other information about pinning according to experts.
ⓣⓘⓟ ☞ Red, orange, and brown are repinned twice as much as blue.
ⓣⓘⓟ ☞ Close up images are repinned more often than pins with a lot of background.
ⓣⓘⓟ ☞ Pins without faces are pinned more often than those with faces.
ⓣⓘⓟ ☞ Prime times for pinning according to experts is 2-4 pm EST and 7 pm - 12 am EST.
Stay tuned for more information about Pinterest and pinning next week. If you have a question, feel free to add a comment or email me.
Pinterest Tips Part 1
1) Business Account - Be sure you change your personal account over to a business account or start a new business account. I changed mine over from a personal account to a business one instead of starting over. I don't have enough time in my day to keep track of 2 Pinterest Accounts. To convert your account, go to Pinterest Business. Choose Convert Now and follow the steps. You will not lose followers by doing this, and you will not lose your boards.
ⓣⓘⓟ ☞ Add your logo or picture that you use in your store & social media. Your profile description is only 160 characters, so be short and sweet in your description.
2) Boards - Set up boards for your TPT Store, your blog, and any teaching boards pertaining to your area. For mine, I have general boards for math and teaching and then boards for different math areas. Put your store, blog, and teaching boards at the top. If you have seasonal boards, be sure to move those towards the top for that season.
ⓣⓘⓟ ☞ Moving boards is very easy. Just click on the board and while holding the mouse button down, move the board to where you want it to be.
3) Personal Boards - I also have some personal boards in my collection. I don't feel bad about it, and I don't apologize for it. I know there are some "camps" that say you should NOT have personal boards in with your teaching boards. I don't agree. Teachers are real people. They look for recipes, craft ideas, home decorating ideas, faith, quotes, etc. I've not lost any followers just because I kept my personal boards. I will say that I did make a few of my personal boards secret like my camping board. I also make my business boards secret with one exception. I do have a board titled: Create an Amazing TPT Store. (Click on the link if you are interested.) I created it to go along with this blog. I put it at the very end of my 70+ boards.
ⓣⓘⓟ ☞ If you want personal boards mixed in, I suggest putting them after your teaching boards. If you don't want them mixed in, edit the boards and make them secret.
3) Board Covers - Your board covers don't need to match. If that's your style, great! If it's not, great! I had matching boards at one time but no longer. From what I've read and heard, choose a pin that best represents your board. You can change your board cover whenever you find a different pin/image that best represents your board. Nothing to make = TIME SAVER!
ⓣⓘⓟ ☞ To change your board cover, click on Edit Board. Choose CHANGE next to cover. Then scroll through the images and pick the one you want. Your image (if it is not a pin already) has to be on your board.
4) Board Titles & Descriptions - Pinterest is now very big into keywords. You know that list of words that appears across the screen when you search Pinterest? Those are keywords that Pinterest uses. Create titles that are specific so people can find you. Don't go with cutesy, fun titles. Be sure to give each of your boards a keyword-rich description. These do show under your board title just an FYI, so don't get carried away with keywords. Give a helpful description telling what your board is about.
Stay tuned for Part 2 next week.
Subscribe to:
Posts (Atom)